글
우선 /etc/snmp/snmpd.conf 파일을 다음처럼 수정…
com2sec readonly default public
#com2sec readwrite default private
기본값은 paranoid인데, readonly로 수정했습니다. 그리고 /etc/default/snmpd 파일을
이렇게 수정해서, 다른 서버에서 들어오는 요청에도 응답하도록 수정합니다. 다만, 이렇게 수정한다면 서버가 잘 동작하는 firewall 아래 있어야겠지요. 아니면, SNMP v3로 사용자 계정을 설정한다던가 하는 다른 방법을 선택해야 합니다.
서비스를 재시작합니다.
아래 명령을 실행해서 출력이 제대로 나오는지 확인해보세요.
[출처] Ubuntu 10.04에 CACTI 설치 관련 SNMPD 설정|작성자 미친푸우
시스템 자원을 모니터링하는 Cacti
이렇게 생긴거다.. 자세한 내용이나 스크린샷은 아래 링크에서 구경할 수 있겠다.
http://www.cacti.net/features.php http://www.cacti.net/screenshots.php
요구사항은 아래와 같다. (http://www.cacti.net/downloads/docs/html/requirements.html)
- RRDTool 1.0.49 or 1.2.x or greater
- MySQL 4.1.x or 5.x or greater
- PHP 4.3.6 or greater, 5.x greater highly recommended for advanced features
- A Web Server e.g. Apache or IIS
CentOS 기준임.. 우선 몇가지 패키지를 미리 설치하자.
# yum install httpd
# yum install mysql mysql-server
# yum install php php-mysql php-snmp php-gd php-devel
# yum install gd gd-devel
# yum install libart_lgpl libart_lgpl-devel
# yum install zlib zlib-devel
# yum install libxml2 libxml2-devel
# yum install libpng libpng-devel
# yum install freetype freetype-devel
# yum install net-snmp-*
# yum install pango-devel
snmp 설정을 바꿔주고.. 재구동
# vi /etc/snmp/snmpd.conf
com2sec public default public
group public v1 public
group public v2c public
group public usm public
view all included .1
access public “” any noauth exact all none none
# /etc/rc.d/init.d/snmpd stop
# /etc/rc.d/init.d/snmpd start
MySQL 이나 Apache 구동은 아래처럼 하면 되겠다.
# /etc/rc.d/init.d/mysqld start
# /etc/rc.d/init.d/httpd start
서버 부팅시 자동으로 데몬이 실행되게 하려면 이런 식으로..
# chkconfig httpd on
Apache에서 php를 연동하기 위해 php.conf 와 httpd.conf 를 열어서 아래처럼 수정
# vi /etc/httpd/conf.d/php.conf
AddHandler php5-script .php .htm .html
AddType application/x-httpd-php-source .phps .php .htm .html
# vi /etc/httpd/conf/httpd.conf
Options Indexes FollowSymLinks -> Options -Indexes
AllowOverride None ->AllowOverride All
DirectoryIndex index.html index.html.var -> DirectoryIndex index.html index.htm index.php
AddType application/x-httpd-php .htm .html .php .ph .php3 .php4 .phtml .inc
AddType application/x-httpd-php-source .phps
AddHandler cgi-script .cgi
다음은 RRDTool 설치
# cd /usr/local/src
# wget http://oss.oetiker.ch/rrdtool/pub/rrdtool-1.4.7.tar.gz
# tar zxvf rrdtool-1.4.7.tar.gz
# cd rrdtool-1.4.7
# ./configure –prefix=/usr/local/rrdtool
# make && make install
이제 Cacti를 설치하자.
소스로 설치했으면 웹루트를 이렇게 잡을텐데
yum 으로 httpd 설치하면 기본적으로 웹루트가 /var/www/html/
# cd /usr/local/src
# wget http://www.cacti.net/downloads/cacti-0.8.8a.tar.gz
# tar zxvf cacti-0.8.8a.tar.gz
# cp -Rf cacti-0.8.8a /usr/local/cacti
# ln -s /usr/local/cacti /var/www/html/cacti
/usr/local/cacti/include/config.php 를 열어보면 아래처럼 설정되어있다.
기본 설정대로 사용하도록 하겠다.
MySQL을 설정하자
# mysql -u root -p mysql
mysql> create database cacti;
Query OK, 1 row affected (0.05 sec)
mysql> grant all on cacti.* to cactiuser@localhost identified by ‘cactiuser’;
Query OK, 0 rows affected (0.08 sec)
mysql> flush privileges;
Query OK, 0 rows affected (0.02 sec)
기본 스키마를 밀어넣구.
# mysql -u root -p cacti < cacti.sql
# mysql -u root -p mysql
확인
mysql> show databases;
+——————–+
| Database |
+——————–+
| information_schema |
| cacti |
| mysql |
| performance_schema |
| test |
+——————–+
5 rows in set (0.00 sec)
mysql> use cacti;
Database changed
mysql> show tables;
+—————————+
| Tables_in_cacti |
+—————————+
| cdef |
| cdef_items |
| colors |
| data_input |
| data_input_data |
| data_input_fields |
| data_local |
| data_template |
| data_template_data |
| data_template_data_rra |
| data_template_rrd |
| graph_local |
| graph_template_input |
| graph_template_input_defs |
| graph_templates |
| graph_templates_gprint |
| graph_templates_graph |
| graph_templates_item |
| graph_tree |
| graph_tree_items |
| host |
| host_graph |
| host_snmp_cache |
| host_snmp_query |
| host_template |
| host_template_graph |
| host_template_snmp_query |
| plugin_config |
| plugin_db_changes |
| plugin_hooks |
| plugin_realms |
| poller |
| poller_command |
| poller_item |
| poller_output |
| poller_reindex |
| poller_time |
| rra |
| rra_cf |
| settings |
| settings_graphs |
| settings_tree |
| snmp_query |
| snmp_query_graph |
| snmp_query_graph_rrd |
| snmp_query_graph_rrd_sv |
| snmp_query_graph_sv |
| user_auth |
| user_auth_perms |
| user_auth_realm |
| user_log |
| version |
+—————————+
52 rows in set (0.00 sec)
로그와 데이터가 저장되는 디렉토리에 권한을 줍니다.
# chmod 777 log rra
이제 웹브라우저에서 http://xxx.xxx.xxx.xxx/cacti/ 를 쳐보자.
http://xxx.xxx.xxx.xxx/cacti/install/ 로 변경되면서 아래와 같은 화면이 보여진다.
웹상에서 Cacti 를 설치한다.
신규 설치 혹은 업그레이드를 선택할 수 있다.
경로를 제대로 잡아주자.
/usr/local/bin/rrdtool -> /usr/local/rrdtool/bin/rrdtool
Finish 버튼을 클릭하면 다음 화면으로 이동한다. admin / admin 으로 로그인
비밀번호를 바꾸라고 함.
따랑~ 설치는 여기서 끝.
이제 설정을 해보자.
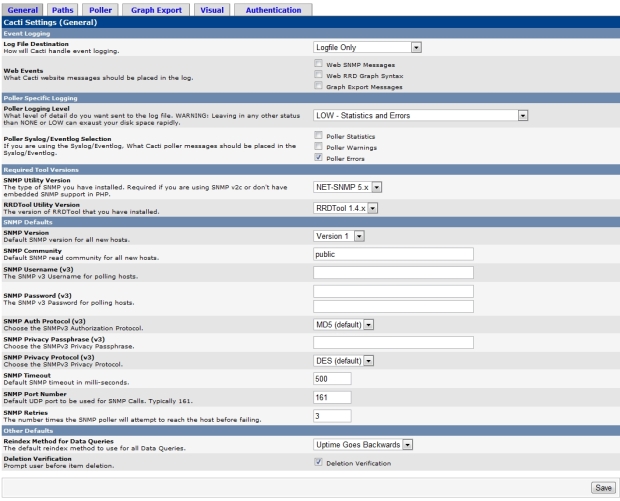
왼쪽 메뉴에서 Configuration -> Settings 선택 후 Ganeral과 Path를 잡아준다.
snmp는 /usr/local/bin 디렉토리가 아니구 /usr/bin 에 있음
왼쪽 메뉴에서 Management -> Devices 선택하고 localhost 클릭.
그래프도 잡아준 뒤 Save 버튼 클릭
자. 이제 그래프를 만들자. 왼쪽 메뉴에서 Create -> New Graphs 를 선택하면
보고자했던 항목이 모두 나열된다. 여기에서 입맛에 맞게 항목을 따로 선택해도 된다.
Create 버튼을 클릭하면, 색상을 바꾸거나 할 수 있다.
그래프가 생성되었다는 메시지..
왼쪽 메뉴에서 Menagement -> Graph Management 를 선택하면, 관리를 할 수 있고.
왼쪽 메뉴에서 Menagement -> Graph Trees 를 선택하면
Default Tree 를 선택하면
Host: Localhost 를 선택하면, 이러함..
상단의 graphs 탭을 선택하면, 이미지가 깨져나온다. 아직 데이터가 안만들어졌으니까.
cacti 에 있는 poller.php 를 실행시켜서 그래프를 생성한다.
# php /usr/local/cacti/poller.php –force
…
…
…
OK u:0.00 s:0.00 r:2.99
OK u:0.00 s:0.00 r:2.99
OK u:0.00 s:0.00 r:3.00
05/31/2012 04:22:13 PM – SYSTEM STATS: Time:3.1194 Method:cmd.php Processes:1 Threads:N/A Hosts:2 HostsPerProcess:2 DataSources:54 RRDsProcessed:32
5분마다 자동으로 실행되도록 crontab을 이용할 경우
# crontab -e
*/5 * * * * /usr/bin/php /usr/local/cacti/poller.php > /dev/null 2>&1
아래처럼 뭔가 스믈스믈 그려지는게 보일것이다.
http://blog.naver.com/PostView.nhn?blogId=kkh0879&logNo=70131310498
http://latunyj.wordpress.com/2012/04/26/install-cacti-on-ubuntu-10-04-lts/
'Linux' 카테고리의 다른 글
| iptables 를 이용한 국가별 IP 차단. (0) | 2014.01.21 |
|---|---|
| iptables 를 이용한 domain 접근 제어. (0) | 2013.11.12 |
| 우분투 telnet 접속 설정. (0) | 2013.07.12 |
| [XEN] XenCenter on Linux , 우분투에서 xencenter 사용하기 (0) | 2013.07.10 |
| 리눅스 실제 CPU 속도보다 클럭이 낮게 나올 때. (0) | 2013.07.05 |


RECENT COMMENT